

How to Create a To-Do List with React
Step-by-Step Guide 👣

Hello World, my name is Hugo. I’m a Christian, husband, and father. I hold a degree in Administration and have experience in the military as an air traffic controller. Additionally, I’m a frontend developer, fascinated by technology, and constantly seeking to learn new things.
To-do lists are an essential tool for organizing day-to-day tasks. With React, one of the most popular JavaScript libraries for building user interfaces, we can create a dynamic and interactive To-Do List. In this tutorial, we'll guide you through the process of creating a simple To-Do List using React, from the initial setup to implementing basic functionalities.
Prerequisites 💡
Before we dive into building our To-Do List with React, let's ensure that you have Node.js and npm installed on your machine. Here's how you can verify and install them if needed:
Verifying Node.js and npm Installation
Open your terminal (Command Prompt, PowerShell, or Terminal) and run the following commands:
To check the version of Node.js installed:
node -v
To check the version of npm installed:
npm -v
If both commands return a version number, it means Node.js and npm are already installed on your machine.
Installing Node.js and npm
If Node.js and npm are not installed or if the commands above don't return a version number, follow these steps to install them:
Download the Installer: Visit the official Node.js website at nodejs.org and download the installer for your operating system (Windows, macOS, or Linux).
Install Node.js: Run the downloaded installer and follow the installation instructions. The installation process will automatically install both Node.js and npm.
Verify Installation: Once the installation is complete, open a new terminal window and run the node -v and npm -v commands again to verify that Node.js and npm are installed correctly.
Step 1: Setting Up the Environment
Let's start by creating a new React application. Open your terminal and run the following command:
npx create-react-app todo-list
This will create a new folder named todo-list with the basic structure of the React project.
Step 2: Project Structure
After creating the React application, navigate to the project directory and open it in your preferred code editor. Inside the src folder, you'll find the main project files. To keep our code organized, let's create three new folders: components, pages, and styles.
todo-list/
  ├── src/
  │   ├── components/
  │   ├── pages/
  │   └── styles/
Step 3: Creating Components
Inside the components folder, create two new files: TodoForm.js and TodoItem.js. The TodoForm will be responsible for adding new tasks to the list, while TodoItem will be responsible for displaying each item in the task list.
TodoItem.js
Let's start by implementing the TodoItem. Here's a basic example of the code for this component:
// TodoItem.js - https://hashnode.com/@hugotav
import React from 'react'; //1

const TodoItem = ({ todo, toggleTodo }) => { //2
  const handleToggle = () => { //3
    toggleTodo(todo.id); //4
  };

  return ( //5, 6 e 7
    <div className={`todo-item ${todo.completed ? 'completed' : ''}`}>
      <input
        type="checkbox"
        checked={todo.completed}
        onChange={handleToggle}
      />
      <p>{todo.text}</p>
    </div>
  );
};

export default TodoItem; //8
import React from 'react';: This line imports the React library, which is necessary for creating React components.const TodoItem = ({ todo, toggleTodo }) => {: This declares a functional component named TodoItem, which accepts two props:todoandtoggleTodo. Thetodoprop represents an individual todo item, and thetoggleTodoprop is a function used to toggle the completion status of the todo item.const handleToggle = () => {: This defines a function namedhandleToggle, which will be called when the checkbox is clicked.toggleTodo(todo.id);: This calls thetoggleTodofunction, passing the ID of the todo item as an argument. This function is responsible for toggling the completion status of the todo item.<div className={`todo-item ${todo.completed ? 'completed' : ''}`}>: This creates a element with a CSS class of "todo-item". If the todo item is completed (based on the completed property), the class "completed" will be added to the element, which can be used to apply styling indicating that the todo item is completed.<input type="checkbox" checked={todo.completed} onChange={handleToggle}/>: This creates a checkbox input field. The checked attribute is set based on the completed property of the todo item. If the todo item iscompleted, the checkbox will bechecked. The onChange event handler is set to call thehandleTogglefunction when the checkbox is clicked.<p>{todo.text}</p>: This displays the text content of the todo item inside a<p>element.export default TodoItem;: This exports the TodoItem component so that it can be imported and used in other parts of the application.
TodoForm.js
Now, let's implement the TodoForm. This component will have a text field for adding new tasks to the list.
// TodoForm.js - https://hashnode.com/@hugotav
import React, { useState } from 'react'; //1

const TodoForm = ({ addTodo }) => { //2
  const [text, setText] = useState(''); //3

  const handleSubmit = (e) => { //4
    e.preventDefault();
    if (!text.trim()) return;
    addTodo(text);
    setText('');
  }

  return ( //5, 6 e 7
    <form onSubmit={handleSubmit}>
      <input
        type="text"
        value={text}
        onChange={(e) => setText(e.target.value)}
        placeholder="Add new task"
      />
      <button type="submit">Add</button>
    </form>
  );
}

export default TodoForm; //8
import React, { useState } from 'react';: This line imports React and theuseStatehook from the React library. TheuseStatehook is used to manage state within functional components.const TodoForm = ({ addTodo }) => {: This declares a functional component named TodoForm, which accepts a prop namedaddTodo. This prop is a function used to add a new todo item to the list.const [text, setText] = useState('');: This line uses theuseStatehook to create a state variable namedtext, which represents the value of the input field in the form. The initial state is an empty string. ThesetTextfunction is used to update the value oftext.const handleSubmit = (e) => { ... }: This defines a functionhandleSubmitwhich is triggered when the form is submitted. It prevents the default form submission behavior, checks if the input field is not empty, adds the new todo item using theaddTodofunction, and then resets the input field to an empty string.<form onSubmit={handleSubmit}>: This creates a form element with anonSubmitevent handler set tohandleSubmit, so that when the form is submitted, thehandleSubmitfunction is called.<input type="text" value={text} onChange={(e) => setText(e.target.value)} placeholder="Add new task" />: This creates a text input field. The value of the input is controlled by thetextstate variable. When the input value changes, theonChangeevent updates thetextstate using thesetTextfunction.<button type="submit">Add</button>: This creates a submit button for the form.export default TodoForm;: This exports the TodoForm component so that it can be imported and used in other parts of the application.
Step 4: Implementing the Task List
Inside the pages folder, create a new file named TodoPage.js. This file will be responsible for managing the state of the task list and rendering the TodoForm and TodoItem components.
// TodoPage.js  - https://hashnode.com/@hugotav

import React, { useState } from 'react';
import TodoForm from '../components/TodoForm'; // Importing TodoForm component from TodoForm.js file
import TodoItem from '../components/TodoItem'; // Importing TodoItem component from TodoItem.js file
import '../styles/TodoStyles.css'; // Importing CSS styles for TodoPage

// Declaring functional component TodoPage
const TodoPage = () => {
  // Declaring state variable 'todos' and function 'setTodos' using useState hook
  const [todos, setTodos] = useState([]); // Initial state is an empty array

  // Function to add a new todo item to the list
  const addTodo = (text) => {
    const newTodo = { id: Date.now(), text, completed: false }; // Creating a new todo object with unique ID, provided text, and initial completion status
    setTodos([...todos, newTodo]); // Updating the state by adding the new todo item to the existing list of todos
  }

  // Function to toggle the completion status of a todo item
  const toggleTodo = (id) => {
    // Mapping over the existing todos array and toggling the completion status of the todo item with the specified ID
    const updatedTodos = todos.map(todo =>
      todo.id === id ? { ...todo, completed: !todo.completed } : todo
    );
    setTodos(updatedTodos); // Updating the state with the updated todo list
  }

  // Rendering JSX (JavaScript XML) to represent the TodoPage component
  return (
    <div className="todo-page"> {/* Container div with class name "todo-page" */}
      <h1>To-Do List</h1> {/* Heading for the todo list */}
      <TodoForm addTodo={addTodo} /> {/* Rendering TodoForm component and passing addTodo function as prop */}
      <div className="todo-list"> {/* Container div for displaying todo items */}
        {todos.map(todo => (
          <TodoItem key={todo.id} todo={todo} toggleTodo={toggleTodo} />
        ))} {/* Mapping over the todo list and rendering TodoItem component for each todo item */}
      </div>
      <div className='todo-credits'> {/* Container div for displaying credits */}
        <a href='https://hashnode.com/@hugotav'>By Hugo Tavares</a> {/* Link to the author's profile */}
      </div>
    </div>
  );
}

export default TodoPage; // Exporting TodoPage component for use in other files
Step 5: Styling the Application
Finally, let's style our application. Inside the styles folder, create a file named TodoStyles.css and add CSS styles for the components.
/* TodoStyles.css - https://hashnode.com/@hugotav */
.todo-page {
  max-width: 400px;
  margin: 0 auto;
  padding: 20px;
  background-color: #f4f4f4;
  border-radius: 8px;
}

.todo-page h1{
  text-align: center;
}

.todo-item {
  display: flex;
  align-items: center;
  margin-bottom: 0px;
}

.todo-item p {
  margin-left: 8px;
}

.todo-item input[type="checkbox"] {
  margin-right: 8px;
}

.completed {
  text-decoration: line-through;
  color: #888;
}

.completed input[type="checkbox"] {
  opacity: 0.5;
}

.todo-list {
  margin-top: 0px;
  margin-bottom: 0px;
}

.todo-credits {
  margin-top: 20px;
  align-items: center;
  text-align: center;
  font-size: smaller;
  font-weight: bold;
}

.todo-credits a {
  text-decoration: none;
}
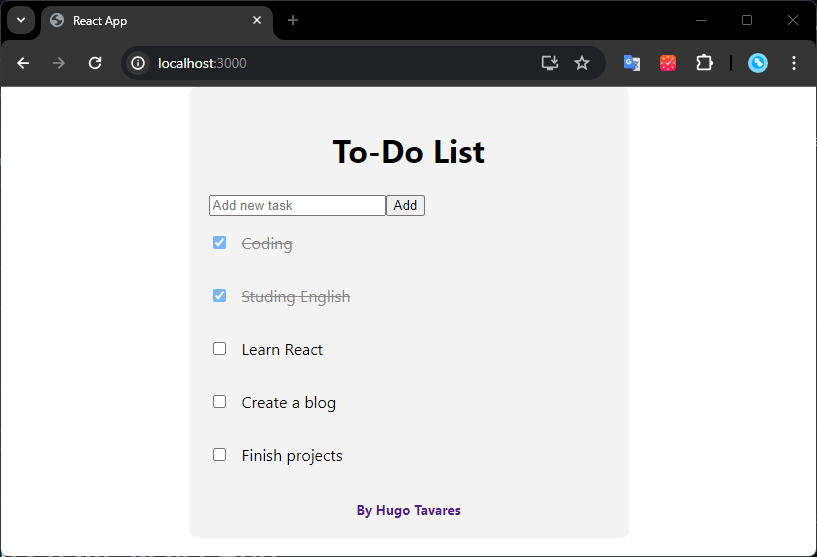
Viewing Your Work 👀
After following all the steps to create your Todo List with React, you'll be ready to view your work. To do this, the key command is npm start, which starts the development server and opens your React application in a web browser.
Running the Application
Make sure you're in the directory of your project in the terminal. Then, execute the command:
npm start
This will start the development server and compile your React application. Once the compilation is complete, your default browser will automatically open, and you'll see your Todo List in action.
Accessing the React Page
If the browser doesn't open automatically, you can manually access your application by typing the following address into the browser's address bar:
http://localhost:3000
This will open the home page of your React application, where you can interact with your Todo List, add new tasks, mark tasks as completed, and more.
Keeping the Server Running
While you're working on your project, the development server will be running, and any changes you make to the files will automatically be reflected in the browser without needing to restart the server.
Shutting Down the Server
When you're finished working on your application, you can shut down the development server by pressing Ctrl + C in the terminal where the server is running.
With this, you'll have full control over your React application and can view and test your work as you progress in developing your Todo List.
Now that you've learned how to view and access your React application, you're ready to create your own Todo List and explore all the potential that React has to offer!
Conclusion ✅
Now that we've implemented our basic To-Do List with React and added the functionality to mark tasks as completed, the possibilities for expansion are endless. You can further enhance your application by adding features like task deletion, filtering tasks by completion status, or even integrating with a database to save tasks persistently.
This tutorial has provided you with a solid foundation to start creating your own applications with React. Whether you're building a simple to-do list or a complex web application, React offers the flexibility and power to bring your ideas to life. I hope you found this tutorial helpful, and I can't wait to see what you create next! 😉


